
Each year I like to make a Christmas decoration.
This year, I've made some really large ones!
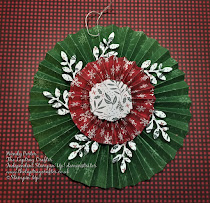
These are lovely to make - they are just a huge accordian style rosettes.
To make I used:
Follow these instructions to make a roseette using the 12" x 2" piece.
Adhere smaller rosette to larger... tip: use lots of glue on your 2" circles and they should join together perfectly.
Decorate as you wish... this is a chance to use punches, dies - just anything you fancy -for this one I dug out an old punch and punched out some stars from gold foil, then I added a ribbon bow...soooo pretty!

I punched a small hole in my rosettes so a piece of twin can be threaded through so they can be hung up


To make these you do need a trimmer, a score board, scoring tool and lots of glue... you could also do with an extra hand! ))
circle with the 12" x 2" piece.
Glue both concertina circles together and decorate as you wish.
The designer series paper I chose to use is now retired, but you could make these with any paper from your crafty stash

No comments:
Post a Comment