
Hello everyone
Thank you for joining us for our Stampin' Up!® Demonstrator Training Support Group monthly Blog Hop! We are so happy that you could join us today for this blog hop for ideas and creative inspiration. We are a group of Stampin' Up!® Demonstrators from around the world that are taking part in a programme that will help us in our Stampin' Up!® businesses.
Thank you very much for your support!
You may be starting here or have come from another blog - either way you can find the link list at the bottom of this post so that you can see every blog post and idea today.
Today I've been playing with the The Quite Curvy stamp and die bundle, the Double Oval punch all from the soon to come January to June Mini catalogue and the Oh So Ombre designer series paper that is FREE with a purchase of £45 during the Sale-a-bration promotion which starts on 5 January 2021 too.

Here is one of the cards I shall be sending to my customers to say Thank you for ordering from me this month.

Here are the sizes of the card I used to create this card
Card base:
Whisper White Thick card: 4-1/8" x 11-3/4", score at 5-7/8"
Fold and emboss to create an A6 card base
Card front:
Whisper White card: 5-1/2" x 3-3/4"
*Oh So Ombre Designer series paper: 6" x 4"
Whisper White card: scrap for sentiment
Blackberry Bliss card to punch shape
I also used
- Quite Curvy stamp set and die bundle
- Subtles 3d embossing folder
- *Oval duet punch
- Blackberry Bliss ink
- *Snail Mail Twine Combo Pack
- Basic Pearls
*New products
How I made this card:
With Blackberry Bliss ink, stamp the sentiment onto a Whisper White scrap and punch out the oval shape using the Oval Duet punch.
Punch the larger scallop oval shape from Blackberry Bliss card, also using the Oval Duet punch.
Fold the designer series paper in half (2" x 6")
With the fold at the the top, use the curvy die to make a horizontal cut just down from the fold.
Tip: lay die with curved cutting line at the top.
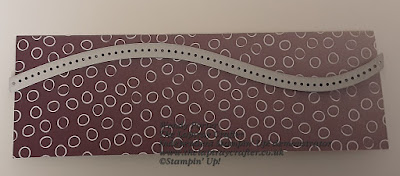

Adhere the two cut pieces to the embossed Whisper White card at top and bottom and cut off the overhanging pieces at the the side

Adhere the Whisper White sentiment piece to the Blackberry Bliss punched shape.
Adhere the oval shape piece as shown with dimensionals.
Decorate with Basic Pearls and add a twine bow.

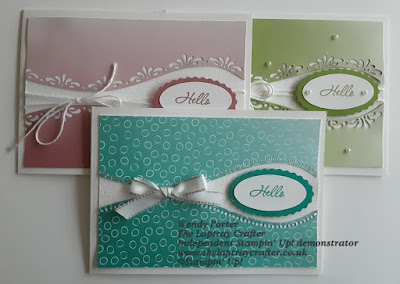
The Oh So Ombre FREE designer series paper pack has sheets in Blackberry Bliss, Granny Apple Green, Bermuda Bay and Rococco Rose. There are 2 patterns; one with bubbles and the other plain, but all with a pretty ombre effect.
Here are similar cards made in each of the colours
Thank you so much for coming by today!
Don't forget some of the products are NEW products from the upcoming January - June 2021 Mini Catalogue. If you would like these new products you can join my team and order them now
Please do visit the other demonstrators who are joining me on this training programe.
Remember you are currently on my page - Wendy Porter, The Laptray Crafter from the UK.
Please see who is below me and visit them too.The
Happy Crafting!
Wendy
Lovely set of cards Wendy! Thank you for taking part in our Demonstrator Training Blog Hop this month!
ReplyDeleteThank you Kylie... and a big thank you setting the whole thing up.
DeleteI love the layout you have used here Wendy! Great idea to put the oval sentiment where it is! :)
ReplyDeleteThank you, am pleased you like it.
DeleteLovely card Wendy, love the way the curves cup the sentiment x
ReplyDeleteThank you, glad you like it too x
DeleteVery pretty!
ReplyDeleteThank you for commenting.
DeleteThank you for sharing Wendy, especially like seeing the different colors and broken down steps.
ReplyDeleteThank you, glad you found the post useful.
DeleteWant this dsp. Lovely cards. Thank you for sharing
ReplyDeleteI love your use of the Curvy Dies - unique, simple and stunning with the DSP you selected. Thank you for sharing.
ReplyDelete